Wednesday 30 June 2010

How to track HTML Page Access in Oracle Applications Release 12.0

Page access tracking allows Oracle Application usage statistics and performing Web site traffic analysis. For Web-based applications based on the Oracle Applications Framework (OAF), Page Access Tracking transparently captures application-rich context information for every user click. In terms of performance, the data capture has negligible overhead.
How to configure
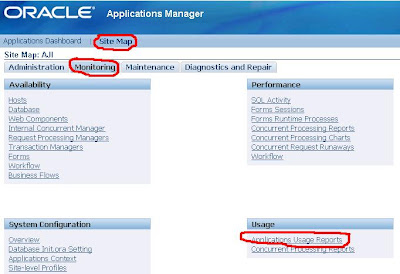
Oracle Applications Manager: Site Map > Monitoring > Applications Usage Reports > Page Access Tracking and Sign-on Audit Configuration


On the Page Access Tracking Configuration page, you can enable or disable Page Access Tracking for your site


Page Access Tracking data is logged in the database in a staging area. It needs to be migrated and mined before the UI reports are refreshed. How frequently Page Access Tracking Data needs to be migrated and mined depends on how updated the UI reports need to be. Generally speaking, the recommendation is to run the concurrent program once a day (preferably at midnight) for the reports to be up to date.


Use the following procedure to schedule the concurrent program "Page Access Tracking Data Migration" using Concurrent Manager:
After the Concurrent Program completes, you should be able to view the latest data reports and statistics in the Oracle System Administrator Console. 
The page is located at Settings > System > Page Flow Logging > Reports.


Page Access Tracking data is buffered within each JVM and periodically asynchronously flushed to the database. The flush is triggered by the following site-level profiles:

JTF_PF_FLUSH_INTERVAL, which defines a time interval. The default value is 120 seconds.
JTF_PF_BUFFER_SIZE, which defines the maximum number of page log accesses in the buffer. The default value is 20 accesses.

The data is flushed to the database when the specified time interval is reached, or when the number of page log accesses exceeds the configured buffer size. These parameters can be modified from their default values through Oracle Forms. The default values are used if the profiles are not set.

The amount of data recorded by Page Access Tracking depends on what applications, responsibilities and users have tracking turned on, the tracking level selected and user traffic. On a regular basis, the System Administrator should purge the Page Access Tracking repository. The frequency of data purge also depends on how much historical tracking data is needed in the UI reports.

Use the following procedure to schedule the concurrent program "Page Access Tracking Purge Data" using Concurrent Manager:

Tuesday 29 June 2010

How to sync refreshed database with already applied patches in Test Apps Tiers

Normally, we are applying patches to Test Instance. But here the sitution is that after applying the patches to the Test instance, suddenly need to refresh the database with latest from production db.

We can perform the database refresh part without having any problems, but how will be sync already applied patch to the newly refreshed database.

In this case, we have to use the adpatch option
"options=nocopyportion,nogenerateportion". 

By doing this, only the database portion will be applied, and the database will be in sync with the application in terms of those earlier patches.

Cheers!!

Monday 28 June 2010

How to Upgrade Oracle Application Server to 10.1.3.5 (10g R3 patchset 5)

Recently I have upgraded my R12.1.2 with OracleAS 10g Release 3 Patch Set 5 (10.1.3.5.0)
OS: Windows XP
Apps Version 12.1.2

These are the points for Oracle Application Server 10.1.3 Upgrade in R12
1. There are two Oracle Homes under application tier in R12  and other one is in Database Tier
a) 10.1.2 for forms & reports
b) 10.1.3 for Web (Apache) and J2EE (OC4J for oacore, oafm and forms)
Two Oracle Home (10.1.2 and 10.1.3) are under R12_BASE_INSTALL_DIR/apps/tech_st/

2. OracleAS 10g Release 3 (10.1.3) Patch Set 5 (10.1.3.5.0) is not a complete software distribution, and the patch set can only be applied to an existing Oracle E-Business Suite Release 12 10.1.3 Oracle Home via patch 8626084

3. You should be on minimum 12.0.3 (version of R12/12i) to upgrade 10.1.3 Oracle Home. To check your apps R12 version use
SQL> select release_name from apps.fnd_product_groups;

4. During upgrade, installer will prompt for OC4JADMIN password. If your source oracle home version is 10.1.3.0 then password for oc4jadmin is secret else (for 10.1.3.1/2/3) password is oafm
If you don’t remember oc4jadmin password you can reset oc4jadmin password

5. To check current Oracle Application Server Patchset version i.e. if 10.1.3.0 or 10.1.3.1 or 10.1.3.2
There different ways:
a)cd %IAS_ORACLE_HOME%\config
you can look into file ias.properties, there is an entry for version
b) Using runInstaller
–Invoke runInstaller from 1013_ORACLE_HOME/oui/bin
–Click on Installed Products.
–Select the 10.1.3 Oracle Home and expand the tree. You should see Oracle Application Server Patchset 10.1.3.X patch in the list.
c) Using Opatch
Run the command ‘opatch lsinventory -detail‘
Look for ‘Oracle Application Server PatchSet‘ in the ‘Product‘ column.

Main Upgrade Steps:-
1. Set your environment
Log in to the application tier as the OS user who owns the application tier file system. Navigate to the INST_TOP/ora/10.1.3 and source the [SID_machine].env/.cmd file to set your 10.1.3 ORACLE_HOME. Source [SID_Hostname].cmd

2. Apply OracleAS 10.1.3.5 Patch Set
Unzip patch 8626084 (OracleAS 10g Release 3 (10.1.3) Patch Set 5 (10.1.3.5.0)) into a temporary directory ()

Change directory to /Disk1
Execute runInstaller (UNIX) or setup.exe (Windows)

On UNIX and Linux:

If you have a Global Inventory, invoke the runInstaller program by running the command:

$ ./runInstaller

On Windows, invoke the setup.exe program by running the command:
/Disk1/setup.exe -installAdditionalComponents "oracle.swd.oui.core:ALWAYS_IF_NEW_OR_VERSION_GTE,oracle.swd.oui:ALWAYS_IF_NEW_OR_VERSION_GTE"
Shut down any services started by OracleAS 10.1.3.5 Patch Set

3. Run AutoConfig

4. Apply additional patches to 10.1.3 oracle home (using opatch and not adpatch)

5. Regenerate appsborg.zip and appsborg2.zip files using adadmin

6. Restart application tier services for r12 , click here for how to start/stop services on R12

For step by step OAS upgrade steps for R12 check metalink note 454811.1

References
454811.1  Upgrading to the Latest OracleAS 10g 10.1.3.x Patch Set in Oracle E-Business Suite Release 12
Read Me of Patch  8626084

Sunday 27 June 2010

Generate the Context File on the R12 Database Tier - adbldxml.pl

When I have generated the appsutil.zip file using the following steps
  • Log in to the APPL_TOP environment (source the environment file)
  • Create appsutil.zip file
  • perl [AD_TOP]/bin/admkappsutil.pl
  • perl $AD_TOP/bin/admkappsutil.pl
  • This will create appsutil.zip in [INST_TOP]/admin/out
  • Copy or FTP the appsutil.zip file to the [RDBMS ORACLE_HOME]
  • cd [RDBMS ORACLE_HOME]
  • unzip -o appsutil.zip
There is a problem with appsutil directory under database tier, I did'nt find the scripts directory under appsutil. Due to that I can't run autoconfig in database tier. To solve this issue, need to run adbldxml utility, this will create a new context file on the database tier. The new context file acts as a central repository for database configuration information.

The AutoConfig Build Context utility has been revived and re-introduced in Oracle E-Business Suite R12 for the database tier. It is essential for enabling AutoConfig on the database tier and this utility facilitates and simplifies database upgrades and cross platform migration.

The adbldxml Utility is only supported on the Database - Tier, not on the Applications - Tier in Release12!

In case if the utility is invoked from Applications Tier, you will get error message similar to

Incorrect environment file sourced. Unset apps environment and source RDBMS oracle home environment file.

Invoke adbldxml.pl from  Database Tier only. A new context file on the database tier can be created using the following command :

perl $ORACLE_HOME/appsutil/bin/adbldxml.pl template=[contextfile_template] out=[contextfile_name]

Where [contextfile_template] is the location of the context template (default is $ORACLE_HOME/appsutil/template/adxdbctx.tmp) and [contextfile_name] is the absolute Path of the context file to be generated (the default is $ORACLE_HOME/appsutil/[context_name].xml).

Generating  a new Context file on the Applications - Tier :

run the adclonectx.pl script from.
perl [COMMON_TOP]/clone/bin/adclonectx

To retrieve the applications tier context file ( if it is lost or deleted accidentally) , execute the following command on the applications tier :

perl [COMMON_TOP]/clone/bin/adclonectx.pl retrieve

Saturday 26 June 2010

Relink of module "adpchnew" failed.

I got an issue in RHEL.4 while applying a patch, then after relinking all application modules.
My instance is Application : 11.5.10.2 and database : 10.2.0.4

The following entries in relink error log file
/usr/lib/gcc/i386-redhat-linux/3.4.6/libgcc_s.so: undefined reference to 
`dl_iterate_phdr@GLIBC_2.2.4'
collect2: ld returned 1 exit status
make: *** [/apps/devtappl/ad/11.5.0/bin/adpchnew] Error 1
Done with link of ad executable 'adpchnew' on Fri Jun 25 11:42:36 GST 2010


Relink of module "adpchnew" failed.
See error messages above (also recorded in log file) for possible
reasons for the failure. Also, please check that the Unix userid
running adrelink has read, write, and execute permissions
on the directory /apps/devtappl/ad/11.5.0/bin,
and that there is sufficient space remaining on the disk partition
containing your Oracle Applications installation.

Finally did the following work around to get solve my issue.

#cd /usr/bin
#mv gcc gcc344
#mv g++ g++344
#ln -s gcc32 gcc
#ln -s g++32 g++

Cheers!

Friday 25 June 2010

How to Enable Tracing in Jinitiator

This post explains how to enable tracing in Jinitiator for troubleshooting webform applications while your end user complaining about Jinitiator related issues. This trace will obtain additional information when the application is running - For e.g. to know the files being loaded when the web form application uses images.

There are two ways to enabling tracing in Jinitiator

From client machine, Open the Jinitiator Control Panel.
On Windows select Start - Settings -
Control Panel - Jinitiator 1.3.1.x. Enter the following  in the "java Run Time parameters" textfield:

-Djavaplugin.trace=true
-Djavaplugin.trace.option=basic|net|security|ext|liveconnect.

Tracing set through the Control Panel will take effect when the Plug-in is launched, but changes made through the Control Panel while a Plug-in is running will have no effect until restart.

You can see the trace information in the jinitiator console or in the file
C:\Documents and Settings\\jinitiator131x.trace

The other method is relatively simple

This method assumes you are running a web forms application and the Java Console is active. Press an appropriate number using your alphanumeric keypad (0-5).
This enables tracing on the fly.

The trace level options (0-5) are increasingly verbose with the various levels corresponding to the following:

0 - off
1 - basic
2 - network and basic
3 - security, network and basic
4 - extension, security, network and basic
5 - LiveConnect, extension, security, network and basic

Cheers!

Thursday 24 June 2010

How to configure printers ins EBS 11i/R12

Oracle E-Business Suite offers two printing solutions to handle all your printing requirements. For most printing needs, the Pasta Utility offers quick setup and easy maintenance. For additional flexibility, Oracle E-Business Suite allows you to define your own printer drivers and print styles.

We can summarize these configuration as
1. Setup the printer at the OS level
2. Add a valid entry in the hosts file (Printer Name and the IP Address)
3. Login to System Administrator responsibility
4. Navigate to Install > Printer > Register
5. Define a new printer by entering the Printer Name you have set in the hosts file
6. Save
7. Bounce the Concurrent Manager
8. Submit any standard concurrent request

Cheers!

Wednesday 23 June 2010

What role APPLSYSPUB user plays in oracle applications?

Intially oracle applications connects to this public schema, APPLSYSPUB This schema has sufficient privileges to perform the authentication of an Applications User (FND user), which includes running PL/SQL packages to verify the username/password combination and the privilege to record the success or failure of a login attempt.

The public ORACLE username and password that grants access to the Oracle E-Business Suite initial sign-on form. The default is APPLSYSPUB/PUB.

Once had changed the APPLSYSPUB password must propagate the change to application tier configuration files. If  the instance is Autoconfig enabled, must edit the CONTEXT file on each tier prior to running Autoconfig.

In the CONTEXT file, locate the autoconfig variable “s_gwyuid_pass” and set it to the new password, then run AutoConfig in each applicatins nodes.

Always change password of APPLSYSPUB with FNDCPASS

$ FNDCPASS APPS/[apps_pwd] 0 Y SYSTEM/[system_pwd] ORACLE APPLSYSPUB [new_pwd]

0 & Y are flags for FNDCPASS
0 is request id  (request ID 0 is assigned to request ID's which are not submitted via Submit Concurrent Request Form)
'Y' indicates that this method is directly invoked from the command-line and not from the Submit Request Form.

If you are not using AutoConfig you must manually edit the following configuration files :

1) FND_TOP/resource/appsweb.cfg
2) OA_HTML/bin/appsweb.cfg
3) FND_TOP/secure/HOSTNAME_DBNAME.dbc

All application tier processes (Apaches) must be restarted following the password change and password propagation.

Tuesday 22 June 2010

How to change the default passwords in Oracle Applications

After a fresh installation of Oracle Applications, database contains many default, open schemas with default passwords.
These accounts and corresponding passwords are well-known, and they should be changed, especially for a database to be used in a production environment as a best practice. Default schemas come from different sources and can be classified as below :

1. Default database administration schemas
2. Schemas belonging to optional database features neither used nor patched by E-Business Suite
3. Schemas belonging to optional database features used but not patched by E-Business Suite
4. Schemas belonging to optional database features used and patched by E-Business Suite
5. Schemas common to all E-Business Suite products
6. Schemas associated with specific E-Business Suite products

For the schemas in categories 1, 2 and 3, use standard database commands to change a password:
SQL> alter user [SCHEMA] identified by [NEW_PASSWORD];

For the schemas in categories 4, 5 and 6, use the application password change tool:
$ FNDCPASS APPS/apps_pwd 0 Y SYSTEM/system_pwd ORACLE [SCHEMA] [NEW_PWD]

To save time, category six (6) schema passwords may be changed en masse using FNDCPASS. FNDCPASS accepts a keyword ALLORACLE forcing a change of all managed schemas to the new password. If your version of FNDCPASS does not already support the ALLORACLE keyword, apply patch 5080487.

$ FNDCPASS APPS/apps_pwd 0 Y SYSTEM/system_pwd ALLORACLE [NEW_PWD]
To determine which schemas are managed by E-Business Suite (categories 4, 5 and 6), run the AD adutconf.sql script.

Monday 21 June 2010

FRM-92120 Registry.dat is missing error message with EBusiness Suite 11i

After a new installation of Oracle eBusiness Suite, when launching a forms based function on a particular user PC, the user encounters the following error:

FRM-92120: Registry file https://[hostname.domain]:[port]/OA_JAVA/oracle/forms/registry/Registry.dat is missing

Details
Java Exception
oracle.forms.engine.RunformsException:FRM-92100 :Registry file https://[hostname.domain]:[port]/OA_JAVA/oracle/forms/registry/Registry.dat is missing
at java.lang.Throwable[init](Compiled Code)
at java.lang.Exception.[init]Compiled Code)
at oracle.foronms.engine.RunformsException.[init](Unknown Source)

This error only occurs for a small number of user PCs and is due to the Jinitiator installation not being completed succesfully, or has been corrupted

As a solution to this issue,
  1. From Control Panel click on the Add /Remove program and remove Oracle Jinitiator  on the user's machine.
  2. Relogin to the Oracle Ebusiness Suite which will prompt for a clean install of Oracle Jinitiator.

Sunday 20 June 2010

After doing a clone all the concurrent managers do not start

After Doing a Clone All the Concurrent Managers Do Not Start
Sometimes after cloning, all the concurrent managers are not coming up. Finally I found that its unusual but in Oracle Application Release 11i and 12  also have the same problem.
The symptom of the issue is that, after doing a clone when attempting to start the concurrent manager using the below :

$COMMON_TOP/admin/scripts/
. adcmctl.sh stop apps/apps

Errors found in ICM logfile as
Could not initialize the Service Manager FNDSM__. Verify that has been registered for concurrent processing. 

The reason for this issue is that, FND_NODES table having incorrect node entries (old node from the Source Instance) and that no Service Manager was found for the existing node.

To Solve this issue,
1.  Stop all middle tier services including the concurrent managers.
2.  Stop the database.
3.  Start the database.
4.  Connect SQLPLUS as APPS user and run the following :
EXEC FND_CONC_CLONE.SETUP_CLEAN;
COMMIT;
EXIT;

5.  Run AutoConfig on all tiers, firstly on the DB tier and then the APPS tiers and webtiers to repopulate the required system tables.

6.  Connect to SQLPLUS as APPS user and run the following statement :

select CONCURRENT_QUEUE_NAME from FND_CONCURRENT_QUEUES where CONCURRENT_QUEUE_NAME like 'FNDSM%';

If the above SQL does not returning any value then please do the following:

Go to $FND_TOP/patch/115/sql

Connect SQLPLUS as APPS user and run the following script :

SQL> @afdcm037.sql;

(Note :  The same "afdcm037.sql" is used for Release 12 also ).
This script will create libraries for FNDSM and create managers for preexisting nodes.
Check again that FNDSM entries now exist:

select CONCURRENT_QUEUE_NAME from FND_CONCURRENT_QUEUES where CONCURRENT_QUEUE_NAME like 'FNDSM%';

7.  Go to cd $FND_TOP/bin

  • $ adrelink.sh force=y "fnd FNDLIBR" 
  • $ adrelink.sh force=y "fnd FNDSM" 
  • $ adrelink.sh force=y "fnd FNDFS" 
  • $ adrelink.sh force=y "fnd FNDCRM" 

8.  Run the CMCLEAN.SQL script from the referenced note below (don't forget to commit).
9.  Start the middle tier services including your concurrent manager.
10.  Retest the issue

Also see the document from Metalink
NOTE:218893.1 - How to Create The Service Manager 'FNDSM' on Oracle Applications
NOTE:260887.1 - Steps to Clean Nonexistent Nodes or IP Addresses from FND_NODES
NOTE:134007.1 - CMCLEAN.SQL - Non Destructive Script to Clean Concurrent Manager Tables

Saturday 19 June 2010

Unable to Run Any Concurrent Request

There three ways to occur dead processes in oracle applications:
1. A request failed before completion.
2. User canceled the request from Applications.
3. User killed the session from the Operating System Level.

To fix the issue, need to update the FND_CONCURRENT_REQUEST to reflect dead process.

1.Shut down the Concurrent Managers
2.Search for the oldest request that failed. Note the request_id.
3.Login to SQLPLUS as Apps/password
4.Update  FND_CONCURRENT_REQUEST
  set control_code='X', phase_code='C'
  where request_id ='xxxxxxx';
5.Restart the Concurrent Managers

What are the meaning of the codes in the status_code and phase_code columns of the FND_CONCURRENT_REQUESTS table

STATUS_CODE Column:

A - Waiting
B - Resuming
C - Normal
D - Cancelled
E - Error
F - Scheduled
G - Warning
H - On Hold
I - Normal
M - No Manager
Q - Standby
R - Normal
S - Suspended
T - Terminating
U - Disabled
W - Paused
X - Terminated
Z - Waiting

PHASE_CODE column

C - Completed
I - Inactive
P - Pending
R - Running

Friday 18 June 2010

After application of Patch 9444996 the Forms session hangs

Recently there is an issue after Patch 9444996, application forms session hangs in my 11i CU2 instance.

In the Java console the following stack trace is reported

Exception in thread "AWT-EventQueue-2" java.lang.NoClassDefFoundError: oracle/forms/ui/FScalingImageCanvas
at java.lang.Class.forName0(Native Method)
at java.lang.Class.forName(Unknown Source)
at oracle.forms.handler.ImageItem.class$(Unknown Source)
at oracle.forms.handler.ImageItem.getDefaultClass(Unknown Source)
at oracle.forms.handler.UICommon.instantiate(Unknown Source)
at oracle.forms.handler.UICommon.onCreate(Unknown Source)
at oracle.forms.handler.ImageItem.onCreate(Unknown Source)
at oracle.forms.engine.Runform.onCreateHandler(Unknown Source)
at oracle.forms.engine.Runform.processMessage(Unknown Source)
at oracle.forms.engine.Runform.processSet(Unknown Source)
at oracle.forms.engine.Runform.onMessageReal(Unknown Source)
at oracle.forms.engine.Runform.onMessage(Unknown Source)
at oracle.forms.engine.Runform.processEventEnd(Unknown Source)
at oracle.ewt.lwAWT.LWComponent.redispatchEvent(Unknown Source)
at oracle.ewt.lwAWT.LWComponent.processEvent(Unknown Source)
at java.awt.Component.dispatchEventImpl(Unknown Source)
at java.awt.Container.dispatchEventImpl(Unknown Source)
at java.awt.Component.dispatchEvent(Unknown Source)

Finally found the cause of this , Applications Interoperability Patch 9410366 is not applied on top of Forms 6.0.8.28 (Patchset 19)

The Forms MLR Patch 9444996 delivers class oracle/forms/ui/FScalingImageCanvas. However the current $FND_TOP/java/make/fndjar.dep does not reference this class. This makes that it's not included in the fndforms.jar file and this error is raised when FScalingImageCanvas.class is called in the Forms Applet.

The Patch 9410366 gives fndjar.dep version 115.293 including the reference to FScalingImageCanvas.class and makes that the class is included in the fndforms.jar file when running Generate Product JAR files in adadmin.

To resolve the error perform the following steps:
  • Download and apply Patch 9410366 APPLICATIONS INTEROPERABILITY PATCH FOR DEVELOPER 6I PATCHSET 19 (6.0.8.28.X). This delivers fndjar.dep 115.293 including the reference for class oracle/forms/ui/FScalingImageCanvas
  • Generate the Product JAR files with adadmin to have the class included in the fndforms.jar ( 1. Generate Applications Files menu > 5. Generate product JAR files) 
  • Retest the issue to confirm problem is resolved

Thursday 17 June 2010

How to bounce Apache, clear HTML cache and have updated Java code class active in R12


In this post, sharing the difficulties of boucing Apache, clearing HTML comparing with 11i.

To clear HTML cache and bounce Apache at R12 level, firstly goto the scripts directory of R12
cd $INST_TOP/admin/scripts

To clear HTML cache :

The _pages directory under $COMMON_TOP should not be cleared for E-Biz R12, which we used to do in 11i applications. For clearing middle tier cache in R12,
Navigate to Functional Administrator responsibility > Core Services >  
Caching Framework > Global Configuration > Clear cache

Instead of clearing the _pages in R12 creates blank login page issue, as in R12 the jsp files does not get compiled automatically.

cd $INST_TOP/admin/scripts
adapcctl.sh start
adapcctl.sh start

At R12 level bouncing apache command  is different of the one to bounce oacore oc4j engine andothers.
An example of situation is : how  to make a modification to a JSPand have that modification recognized by the OC4J - JSP engine.

In 11i the apache start and stop command, also bounce the JVM running on JSERV and clear caches by doings as below :
To clear the jsp & modplsql caches run this command
rm -Rf $OA_HTML/_pages/*
rm -Rf $COMMON_TOP/_pages/*
rm -Rf $IAS_ORACLE_HOME/Apache/modplsql/cache/*

But in R12 the command to stop and start apache only takes action on Apache web server  and not on the OC4J container that executes the JVM.
To bounce the OC4J container there is an specific script:

$INST_TOP/admin/scripts/adoacorectl.sh

Therefore when making  a modification to a JAVA class in R12 for the web application,  in order to have  that change recognized,  it is needed to bounce
OC4J using adoacorectl.sh script.

Bouncing oacore OC4J engine may also be needed  if you make modifications to system properties.
Example for JTT based applications:  jtt system properties.

Wednesday 16 June 2010

Pfile vs SPfile

Until Oracle 8i DBAs have been using a text file called the pfile (parameter file) to store the database initialization parameters.

As of Oracle9i, new feature called the spfile (server parameter file). The spfile is a binary file that contains the same information as the old pfile.

The spfile is a server-side initialization parameter file; parameters stored in this file are persistent across database startups.

This makes all the changes made to the instance using the ALTER SYSTEM statement persistent. Oracle requires that you start an instance for the first time using the pfile and then create the spfile.

The server parameter file (also called SPFILE) is in a single location where all the necessary parameters are defined and stored. The defined parameter values are applicable for all the instances in the cluster.

The SPFILE permits dynamic changes without requiring you to bring down the instance.

By default, if you do not specify PFILE in your STARTUP command, Oracle will use a server parameter file.

SERVER PARAMETER FILE ( SPFILE )

A server parameter file is basically a repository for initialization parameters.

Initialization parameters stored in a SPFILE are persistent, meaning any parameter changes made while an instance is running can persist across instance shutdown and startup.

In this way, all the initialization parameters manually updated by ALTER SYSTEM SET commands become persistent.

It also provides a basis for the Oracle database server to self-tune.

Another advantage, particularly for multi-instance RAC systems, is that a single copy of the parameter file can be used by all instances. Even though a single file is used to specify parameters, it has different format styles to support both the common values for all instances, as well as the specific values for an individual instance.

A server parameter file is initially built from the traditional text initialization parameter file, using the create SPFILE statement. It is a binary file that cannot be browsed or edited with a text editor.

Oracle provides other interfaces for viewing and modifying parameter settings.  At system startup, the default behavior of the STARTUP command is to read a SPFILE to obtain initialization parameter settings. If the STARTUP command doesn't have a PFILE clause, it reads the SPFILE from a location
specified by the operating system.

If you choose to use the traditional text initialization parameter file, you must specify the PFILE clause when issuing the STARTUP command.

Some initialization parameters are dynamic since they can be modified using the ALTER SESSION or ALTER SYSTEM statement while an instance is running. Use the following syntax to dynamically alter
initialization parameters:

ALTER SESSION SET parameter_name = value
ALTER SYSTEM SET parameter_name = value [DEFERRED]

Use the SET clause of the ALTER SYSTEM statement to set or change initialization parameter values. Additionally, the SCOPE clause specifies the scope of a change as described below:

SCOPE = SPFILE

(For both static and dynamic parameters, changes are recorded in the spfile, to be given effect in the next restart.)

SCOPE = MEMORY

(For dynamic parameters, changes are applied in memory only. No static parameter change is allowed.)

SCOPE = BOTH

For dynamic parameters, the change is applied in both the server parameter file and memory. No static parameter change is allowed.)

For dynamic parameters, we can also specify the DEFERRED keyword. When specified, the change is effective only for future sessions.

How to create server parameter file (SPFILE)
The server parameter file is initially created from a text initialization parameter file (init.ora).

It must be created prior to its use in the STARTUP command.
The create SPFILE statement is used to create a server parameter file.

The following example creates a server parameter file from an initialization parameter file.

CREATE SPFILE FROM PFILE='/u01/oracle/product/10.2.0/dbs/initTEST.ora';

Below is another example that illustrates creating a server parameter file and supplying a name.

CREATE SPFILE='/u01/oracle/product/10.2.0/dbs/TEST_spfile.ora'
FROM PFILE='/u01/oracle/product/10.2.0/dbs/initTEST.ora';

The following example creates a text initialization parameter file from the server parameter file:

CREATE PFILE FROM SPFILE;

The example below creates a text initialization parameter file from a server parameter file, where the names of the files are specified:

CREATE PFILE='/u01/oracle/product/10.2.0/dbs/initTEST.ora'
FROM SPFILE='/u01/oracle/product/dbs/10.2.0/TEST_spfile.ora';

How to find-out that whether database using spfile or pfile ?

The following query will let you know..

1) SQL> SELECT name,value FROM v$parameter WHERE name = 'spfile';
2) SQL> show parameter spfile;

Tuesday 15 June 2010

How to relink a single executable (binary file) using ADADMIN utility ?

In this post, I would like to write something useful for patching and fine-tuning. When times, we have to relink a particular binary file (executable) in connection with patching or else corrupted file etc. I am providing the step-by-step procedure of relinking a particular executable.

Login as owner of Application Tier and source the environment file before starting
$adadmin
You have to enter the answers to the prompt of adadmin as usual

At the AD Administration Main Menu select the option: Maintain Applications Files menu

1. At the Maintain Applications Files menu select the option: Relink Applications programs

2. At the prompt "Do you wish to proceed with the relink [Yes] ?" Hit return for the default option.

2. At the prompt "Enter the name of your Oracle Applications environment file below.
File name [*.env] : " Hit return for the default option or correct the file if necessary.

3. At the prompt "Enter list of products to link ('all' for all products) [all] :" enter the product's short name associated with the target executable, such as "fnd".

4. At the prompt "Generate specific executables for each selected product [No] ?" enter Yes

5. At the prompt "Relink with debug information [No] ?" Hit return for the default option.

6. At the prompt "Enter executables to relink, or enter 'all' [all] :" the exact name of the executable to be relinked.

Another short-cut is that
7. Go to cd $FND_TOP/bin
$ adrelink.sh force=y "fnd FNDLIBR"
$ adrelink.sh force=y "fnd FNDSM"
$ adrelink.sh force=y "fnd FNDFS"
$ adrelink.sh force=y "fnd FNDCRM"

Check the logfile for errors and warning

Cheers!!!

Monday 14 June 2010

Installation of 12.1.1 in Windows XP (Vision Demo instance)

Guidance or Training for Oracle Apps, OBIEE 11g, .NET and Java 

I have installed Oracle E-Business Suite Release 12.1.1 VISION demo instance on Windows XP Professional successfully. .

I have done a single node installation as follows:
Hardware & Software Specifications:
- Intel Core2, CPU 2.13 GHz
- 2.93 GB of RAM
- 300 GB Hard Drive
- Windows XP Professional with Sevice Pack 3
Installation Steps:
Install Windows XP Professional with SP3
Set 'Computer Name' as well as 'Domain Name'.


- Right click on 'My Computer' > Properties > 'Computer Name'  > Change
- Set 'Computer Name' to
- Click on More
- Set a 'Primary DNS Suffix of this Computer' to


Install Microsoft Loopback adapter and define an IP address (10.10.10.10)


pic - 4


For more information on how to do this, please refer to "How to install the Microsoft Loopback adapter in Windows XP":

Add a new entry in C:\windows\system32\drivers\etc\hosts as follows:


10.10.10.10 hostname.domainname.com


From the command prompt, make sure you can do the following:

C:\> ping 10.10.10.10
C:\> ping hostname
C:\> ping hostname.domainname.com

Create a new user ‘visr12’ and make this user a member of:
- Administrators (local user)


Install Visual C++ 8.0 (Which is included in Microsoft Visual Studio 2005) in 'C:\VCPlus' -- Make sure not to install VC++ in a directory that contains spaces.


Install cygwin Software:
Log in as the Admin User
Log in as a local administrative user (the user who runs the Rapid Install.).
Create a Cygwin directory
Create the directory where you plan to install Cygwin (called the Root Directory). This directory cannot be under Program Files, or any other directory with blank spaces in its name. In addition, it cannot be under the APPL_TOP.
Download the Cygwin Software
Perform the following to download the Cygwin software:
Navigate to http://www.cygwin.com and click on "Install or Update Now!" to download setup.exe to your machine.
Run setup.exe and click Next, which will bring up the Choose Installation Type screen.

Choose Option 2, Download without Installing.
Click on Next to go through the next few screens, where you will be asked to choose the directory to store the packages (called the Local Package Directory), your Internet connection type, and a download site.
Click on Next again to get to the Select Packages screen, and select the following packages under the indicated sub-categories* (click on to toggle):


All Default
Archive Default, plus manually select the zip package
Base Default, plus manually select the following extra packages: ash, coreutils, diffutils, findutils, gawk, grep, sed, tar and which
Devel Default, plus manually select binutils, gcc, gcc-core, gcc-g++, make and mktemp
Doc Default, plus manually select cygwin-doc and man
Editors Default, plus manually select vim
Interpreters Default, plus manually select gawk
Shells Default, plus manually select ash and tcsh
Utils Default, plus manually select cygutils and file
Update Compatibility with Shell Scripts


Type these commands to maintain compatibility with existing shell scripts:
C:\> copy gawk.exe awk.exe (answer yes to copy over existing file)
C:\> copy grep.exe egrep.exe
C:\> copy make.exe gnumake.exe
C:\> copy gcc.exe cc.exe

Very Important
Cygwin following packages only supported versions for Windows XP
make 3.79.1-7, 3.80-1,
bash 3.0-11, 3.1-9, 3.2.9-11, 3.2.25-16
grep 2.5.1

According to Note: 414992.1, "Make versions 3.79.1-7 and 3.80-1 from Cygwin are supported for use with Oracle E-Business Suite R12. Other versions are currently not supported". When you will face errors using Relink Applications programs

You can download make (Displayed as "make" at the cygwin site/setup) version 3.80 from this link:

download mirrors for make-3.80-1-src.tar.bz2 (1.20 MB):
2002-05-22  ftp://ftp.hpl.hp.com/gatekeeper/pub/cygwin/release/make/make-3.80-1-src.tar.bz2
2002-05-20  ftp://ftp.nnov.net/pub/mirrors/sources.redhat.com/cygwin/release/make/make-3.80-1-src.tar.bz2
2002-05-21  ftp://ftp.ps.pl/dsk0/cygwin/release/make/make-3.80-1-src.tar.bz2
2002-05-20  ftp://ftp.es.ele.tue.nl/pub/edu/ogo12/release/make/make-3.80-1-src.tar.bz2
2002-05-20  ftp://ftp.kr.freebsd.org/pub/cygwin/release/make/make-3.80-1-src.tar.bz2
2002-05-21  ftp://ftp.cs.nott.ac.uk/sites/sources.redhat.com/ftp/cygwin/release/make/make-3.80-1-src.tar.bz2
2003-05-20  ftp://ftp.holywar.net/pub/mirrors/cygwin/release/make/make-3.80-1-src.tar.bz2
2003-05-19  ftp://ftp.ncku.edu.tw/.snapshot/nightly.9/Unix/Cygwin/release/make/make-3.80-1-src.tar.bz2
2003-05-19  ftp://ftp.ncku.edu.tw/Unix/Cygwin/release/make/make-3.80-1-src.tar.bz2

Add Cygwin Bin Directory to Path
Add the cygwin bin directory to the system path. For instance:


C:\> set path = %path%;C:\cygwin\bin
Note: When using Cygwin with Oracle E-Business Suite, use the make utility installed with Cygwin. The system path must contain only the gnumake.exe in the Cygwin bin directory.

No JDK installation is required, JDK  is bundled with Oracle Applications R12 installation.

Set Up the Stage Area:

Stage Area (D:\Stage12.1) requires 38 GB hard disk space.

Extract the zip files (25 files) which have been downloaded from (http://edelivery.oracle.com). Nothing special to do since the extracted files will create the stage area directory structure by itself. You should see the following structure under 'D:\Stage12.1.' once you are done with the files extraction:

- startCD > Disk1
- oraAppDB > (Disk 1 to Disk 49)
- oraApps > (Disk 1 to Disk 11)
- oraAS > (Disk 1 to Disk 3)
- oraDB > (Disk 1 to Disk 5)

Start the installation:

D:\> cd Stage12.1\startCD\Disk1\rapidwiz
D:\Stage12.1\startCD\Disk1\rapidwiz> RapidWiz.cmd

The installation wizard is similar to 11.5.10 RapidWiz. For 'VC++' and 'Cygwin' I have provided the following paths:


UNIX toolkit directory=C:\VCPlus\VC
Visual Studio Directory=C:\cygwin\bin


- It took almost 4  hours to install the Vision instance
- Total space required to install almost  220 GB for  Vision instance

After successful installation, login to Application without having any problem, but when tried to run a concurrent request there is no concurrent manager is active.
So, I have changed the concurrent request services properties..Log-On -> Allow service to Interact with desktop


And decided to autoconfig both dbtier and application tier
First, source the environment using the following command (start -> run -> cmd and press OK)
C:\oracle\VIS\inst\apps\apps_st\appl\APPSVIS_visr12.cmd
The change to Instance script directory using
cd %ADMIN_SCRIPTS_HOME%
Adautocfg.cmd
After completed successfully, stop the application service
Adstpall.cmd
Then did the autoconfig for DB Tier ( start -> run -> cmd and press OK)
soure the environment using
c:\oracle\VIS\db\tech_st\11.1.0\VIS_visr12.cmd
cd %ORACLE_HOME\appsutils\scripts\VIS_visr12\
Adautocfg.cmd
After successful completion stop both database and listener
Addbctl.cmd stop
Addblstl.cmd stop VIS
Restarted the machine.
Now everything back to normal, concurrent managers are up and running.

If you are looking for the copy of this Vision Instance as VMware clone, you can contact me

I will post the step-by-step explanation for upgrading to 12.1.2 using 7303033 Release Update Pack (RUP2)  patch in the coming post

Cheers!!!
Sunday 13 June 2010

Enable/Disable the Forms Listener Servlet 11i

There are three methods than can be used to enable or disable the Forms Listener Servlet.

OAM Configuration Wizards.
Requires OAM 2.2 or higher (OAM G)
-Navigation:
 -OAM Site Map -> AutoConfig -> Configuration Wizards -> Forms Listener Servlet
 --Choose the Enable or Disable button

OAM Context Editor
-Navigation:
 -OAM Site Map -> AutoConfig -> Edit Parameters (of required Applications Tier Context file)
 --Go to the System Tab
 --Expand the oa_web_server  node
 --Modify the following two variables
 --Forms Servlet URL  (s_forms_servlet_serverurl)
 ---to enable set to /forms/formservlet
 ---to disable set to blank
 ----Forms Servlet Comment  (s_forms_servlet_comment)
 ----to enable set to blank
 ----to disable set to #

Edit the context file ($APPL_TOP/admin/< contextname>.xml)
-Locate the following two variables:
 -< server_url oa_var="s_forms_servlet_serverurl" >
 --to enable set to /forms/formservlet
 --eg: < server_url oa_var="s_forms_servlet_serverurl"> /forms/formservlet
 --to disable set to blank
 --eg: < server_url oa_var="s_forms_servlet_serverurl"/ >
 --< servlet_comment oa_var="s_forms_servlet_comment" >
 ---to enable set to blank
 ---eg: < servlet_comment oa_var="s_forms_servlet_comment"/ >
 ---to disable set to #
 ---eg: < servlet_comment oa_var="s_forms_servlet_comment" > #
If you are migrating from Forms Listener and using Forms Metric Server load balancing the context variable, Metrics Server Load Balancing Host (s_leastloadedhost) will contain a value %LeastLoadedHost%. This must be changed to the Forms Server Host (s_formshost) value. This change is required even if using the Configuration Wizard.

OAM Context Editor navigation paths to these variables under the System Tab:

oa_met_server
Metrics Server Load Balancing Host (s_leastloadedhost)
 -oa_forms_server
 -Forms Server Host (s_formshost)

Saturday 12 June 2010

How To Find Oracle Application File Versions.

In this post, sharing the way of finding the correct version of Oracle Applicatins file version of different component. This should be helpful while patching the applications.

Use the following information for the appropriate file type.

FORM 

adident
cd $AR_TOP/forms/US
Ex. adident Header ARXTWLIN.fmx

strings -a  form.frm |  grep  Revision
Ex.
cd $AU_TOP/forms/US
strings -a POXPOVCT.fmb | grep Revision

Use \Help Version
Or Help, About Oracle Applications

REPORT
cd $AR_TOP/reports
adident
adident Header report.rdf
Ex. adident Header ARBARL.rdf

strings -a  report.rdf  |  grep  Header
Ex.
strings -a ARBARL.rdf  |  grep Header

SQL 
more  sqlscript.sql  Ex.  more ARTACELO.sql

The version will be in a line that starts with 'REM  $Header', and should be one of the first lines in the .sql file.
grep '$Head' sqlscript.sql
Ex.
grep '$Head' ARTACELO.sql

BIN or EXECUTABLE 
An executable in the bin directory will contain numerous C code modules, each with its own version. All of the following examples use ident or strings,
but the difference is what you grep for.

1.  Get ALL file versions contained in the executable.
adident Header executable (Ex. adident Header RACUST)
strings -a  executable  |  grep  Header  (Ex. strings -a RACUST | grep Header)

2.  Get ALL of the product specific file versions.
adident  Header executable (Ex.  adident Header RACUST)
strings -a  executable  |  grep  Header
(Ex.  strings -a  RACUST  |  grep  Header)

3.  Get only the version of a specified module.
strings -a  executable  |  grep  module  (Ex. strings -a RAXTRX | grep raaurt)

4.   A Collection of class file versions

from the directory where the classfile exists in a command prompt run the following:
strings -a Classname.class | grep Header

Get ALL of the product specific file versions.
  
strings -a  executable  |  grep  'Header: product_short_name'
cd $FND_TOP/bin
strings -a WFLOAD | grep 'Header: afspc'
        
Get only the version of a specified module.
  
strings -a  executable  |  grep  module

ORACLE REPORTS 
From the form, select Help, About Oracle Reports.

RDBMS 
1. Use \Help Version
2. Or Help, About Oracle Applications
3. Get into SQL*Plus using any userid/password. You will get a string that tells you the PL/SQL version and data

Roll Back Previous Autoconfig Run

In this post, very simple but useful way of handling autoconfig errors by way of rolling back to previous one. Suppose after autoconfig run you have been identified that some mis-configuration created in you instance environment and requires to rollback to the same old autoconfig file. YES, you can do by running restore.sh script from $APPL_TOP/admin/SID_HOSTNAME/out/MMDDhhmm/ folder under apps Tier.

Whenever run autoconfig, will generate a directory 'MMDDhhmm' under $APPL_TOP/admin/SID_HOSTNAME/out. Inside the directory, there will be several files which autoconfig has taken a backup of existing one before making changes to that. And also create a file to restore named as 'restore.sh'. This script will do the copy of backup files to the original location and this has the effect to rolling back autoconfig run.
For example,
[applmgr@devtapps ]$ cd /apps/devtappl/admin/DEVT_devtapps/out/06111617/
[applmgr@devtapps 06111617]$restores.sh

Hope this helps !!

Friday 11 June 2010

How to set the Organization Context in R12

To set org context to any specific single org:

BEGIN
   MO_GLOBAL.SET_POLICY_CONTEXT('S', ); 
END;

To set the mo security profile so that sqlplus will have same org context as given responsibility

DECLARE
   l_resp_id number;
   l_user_id number;
   l_security_profile_id number;
   l_org_id number;

BEGIN

   SELECT user_id
     INTO l_user_id
     FROM fnd_user
    WHERE user_name LIKE '&USER_NAME';

   SELECT responsibility_id
     INTO l_resp_id
     FROM FND_RESPONSIBILITY_VL
    WHERE responsibility_name LIKE '&responsibility_name';

   FND_GLOBAL.APPS_INITIALIZE(l_user_id,
                              l_resp_id,
                              ); -- APPLICATION_ID: Oracle Payables is 200 

   MO_GLOBAL.INIT('SQLAP');

END;
/

Oracle E-Business Suite Release 12.1.2 is currently available

E-Business Suite Development team recently announced the availability of Oracle E-Business Suite Release 12.1.2.  This release update pack (RUP) combines error corrections, statutory/regulatory updates, and functionality enhancements into a consolidated, suite-wide patchset. Release 12.1.2 is cumulative and includes new updates as well as updates made available in one-off patches after the base 12.1 release.

Oracle E-Business Suite Release 12.1.2 is currently available on My Oracle Support as Patch 7303033. This patch needs to be applied on top of Oracle E-Business Suite Release 12.1.1.

Need to apply it in my Windows XP R12.1.1 Vision instance and will write the details..

Thursday 10 June 2010

How To Set the Applications Context - FND_GLOBAL.APPS_INITIALIZE

In Release 12, the architecture of multi-org and the way in which data is partitioned by operating unit has changed significantly. As a result the ways in which data are stored and accessed has changed.

To set the Application Context value, call procedure
FND_GLOBAL.APPS_INITIALIZE(user_id in number,resp_id in number, resp_appl_id in number security_group_id in number);

This procedure sets up global variables and profile values in a database session. Call this procedure to initialize the global security context for a database session. You can use it for routines such as PL/SQL or other programs that are not integrated with either the Oracle Applications concurrent processing facility or Oracle Forms (both of which already do a similar initialization for a database session). The typical use for this routine would be as part of the logic for launching a separate non–Forms session from an established Oracle Applications form session. You can also use this procedure to set up a database session for manually testing application code using SQL*Plus. This routine should only be used when the session must be established outside of a normal form or concurrent program connection.

EXEC FND_GLOBAL.APPS_INITIALIZE(p_user_id, p_resp_id, p_resp_appl_id);

To get the values of
p_user_id,
p_resp_id
p_resp_appl_id
use the following sql from sqlplus as apps user:

select application_id, Responsibility_id, responsibility_name
from fnd_responsibility_vl
where responsibility_name like 'your_reponsibility_name'

select user_id, user_name
from fnd_user
where user_name = 'your_user_name'

For example:
exec fnd_global.APPS_INITIALIZE (1271,50243,222);

OR:

You can obtain valid values to use with this procedure by using profile option routines to retrieve these values in an existing Oracle Applications form session. 

USER_ID - The User ID number.
RESP_ID - The ID number of the responsibility.
RESP_APPL_ID - The ID number of the application to which the responsibility belongs. 
SECURITY_GROUP_ID - The ID number of the security group. This argument is automatically defaulted by the API. The caller should not pass a value for it. 

You can obtain the values for the input parameters from within Oracle Applications.

To do this:
1. From the top menu, navigate to Help->Examine
2. You will be asked to enter an ORACLE password. Enter the password for the APPS database user.
3. Click on the LOV for Block, and select block $PROFILES$
4. Click on the Field LOV, and select field USER_ID
5. Make a note of the value returned in the Value field.
6. Click on theField LOV again, and select field RESP_ID
7. Make a note of the value returned in the Value field.

Use these values for the USER_ID nad RESP_ID parameters. You can get the application Id from the Diagnostic Apps Check report.

Products must call the MO_GLOBAL.init() API to execute the multiple organizations initialization.

Multiple organizations initialization performs the following:

1.Initializes the security policy predicate
2.Populates a global temporary table that is used in the user interfaces and the security policy function.
The FND_GLOBAL.APPS_INITIALIZE routine does NOT automatically call mo_global.init routine.
You must explicitly invoke the mo_global.init routine to initialize the organization context.

EXEC mo_global.init (p_appl_short_name);

How to Manually Remove Oracle Server Software on Microsoft Windows Platforms

In this post, i would like to share the way of manual removal of oracle software from Microsoft Windows platforms, the recommended method to remove Oracle Server or client software is to use the Deinstall tool.  However there are times when you must do a manual check to see all software and environment settings are properly deleted.  This document will overview the steps necessary to ensure all items are removed from the Windows environment. Beginning with 11.2, the Oracle Universal Installer will no longer be used to remove Oracle software from an environment. However, a new Deinstall tool will be shipped with the Oracle Products

1.  Ensure you are logged in as a user with Local Administrative privileges.

2.  Stop all Oracle services related to the ORACLE_HOME (if any are running):
  • Right click (My) Computer > Manage > Services and Applications OR Configuration > Services.
  • Check the Path to Executable field in the Service's Properties if you are unsure from which ORACLE_HOME the service is running.
  • Close the Services and/or Computer Management window.
3.  Remove any databases using the Database Control Assistant (DBCA) running out of the ORACLE_HOME you are removing.  Remove any listeners using Net Control Assistant (NetCA) running out of the ORACLE_HOME you are removing.

4.  Remove the ORACLE_HOME from the OUI inventory:

%ORACLE_HOME%\OUI\BIN\oui -detachHome ORACLE_HOME=%ORACLE_HOME%

5.  Remove entries in the registry:
  • Start the registry editor:  choose Start > Run > regedit.
  • Go to HKEY_LOCAL_MACHINE\SOFTWARE\ORACLE\KEY_< ORACLE_HOME> and delete that entry.
  • Go to HKEY_LOCAL_MACHINE\SOFTWARE\ODBC.  Expand all subkeys and remove the key: "Oracle in < ORACLE_HOME>".
  • Go to HKEY_LOCAL_MACHINE\SYSTEM\CurrentControlSet\Services. Delete the keys where the name starts with Oracle and has an ImagePath string entry to the ORACLE_HOME to be deleted or a location under it.
  • Go to HKEY_LOCAL_MACHINE\SYSTEM\CurrentControlSet\Services\ocfs and delete that entry.
  • Close regedit.
6.  Clean up the environment settings:
  • Right click on (My) Computer > Properties > Advanced tab OR Advanced System Settings link > Environment Variables button.
  • Under System Variables section, review all variables for any reference to the deleted ORACLE_HOME.  Edit by removing the ORACLE_HOME from the string value (such as removing the home from PATH statement) or by deleting the entire variable.  Common examples are CLASSPATH, ORACLE_HOME, PATH, and PERL5LIB.
  • Click OK to save and exit System Properties.
7.  Clean up the start menu icons:
  • Right click on the Start button and choose Explore All Users.
  • Expand Programs folder.
  • Delete the folder Oracle -< ORACLE_HOME>  and any subfolder.
8.  If this is the only ORACLE_HOME on the server, delete the Oracle folder under C:\Program Files.  DO NOT delete this if there are any other Oracle products on this server.

9.  Reboot the Windows server.

10.  Go to the TEMP/TMP directory and delete all files and directories.

11.  Go to the ORACLE_HOME location and verify all folders/files have been removed.

12.  Empty the Recycle Bin to clear all files.

13.  If you are deinstalling an ORACLE_HOME in a clustered environment (ASM or DB), you will need to check the above steps on all nodes of the cluster.

14.  If you are deinstalling an Oracle Clusterware Home (CRS_HOME), you will also need to do the following:
On all nodes, delete the clusterware drivers in the Windows drivers folder, usually C:\WINDOWS\System32\Drivers:
  • ocfs.sys 
  • oracleacfs.sys
  • oracleadvm.sys
  • oracleoks.sys
  • orafencedrv.sys
  • orafenceservice.sys
On all nodes in regedit, go to HKEY_LOCAL_MACHINE\SYSTEM\CurrentControlSet\Services and remove entries for OraFenceService and ocfs (if exists).

Empty the Recycle Bin on all nodes.

Wednesday 9 June 2010

"No version in patch file" for SNO file

When we apply patch 6435000 to upgrade 12.0.3 to 12.0.4 the patch error out here showing the Autopatch logfile

No version in patch file:
/apps/Upgrade/patches/6435000/msc/bin/setup_SNO.exe

Below is excerpt from adpatch.log

Performing version checking...

Log and Info File sync point:
Mon Jun 07 2010 00:00:12
AutoPatch found some files which it will not apply.
These files are listed in the AutoPatch informational message file.

No version in patch file:
/apps/Upgrade/patches/6435000/msc/bin/setup_SNO.exe

Error occurred in version checking.
See above error messages or AutoPatch log file for details.
Exiting AutoPatch...
Freeing includes hash table
Freeing fixes hash table
Freeing basedons hash table
Freeing entities hash table

You should check the file
/apps/apps_st/appl/appl/admin/TEST/log/adpatch.log

The cause of this error is that, the setup_SNO.exe installed by RUP#3 did not install correctly or file has been corrupted.

To implement the solution, please execute the following steps:

1. Download Patch 6264419 for the same platform as it delivers setup_SNO.exe with the same version 120.0.12000000.3

2. Backup the corrupted file setup_SNO.exe

3. Replace the corrupted file setup_SNO.exe by the valid file downloaded from Patch 6264419

4. Restart adpatch session and continue the patch application

Tuesday 8 June 2010

How to collect Apache and Jserv debugging information - 11i

Whenever users experiences an error, request a screen shot of the error and any further error details that they can report. But in the case of non reproducible, enable the following middle tier debug settings following these steps:

NOTE - If you have configured a Shared Application Tier File System then
please substitute $IAS_CONFIG_HOME for the $IAS_ORACLE_HOME values below.

1. Shut down iAS 10222 (Apache) using the adapcctl.sh (or adstpall.sh) script

2. Backup the existing files in the following files:
   $IAS_ORACLE_HOME/Apache/Apache/logs
   $IAS_ORACLE_HOME/Apache/Jserv/logs
   $IAS_ORACLE_HOME/Apache/Jserv/logs/jvm

After making a copy of these files, please archive these files into a separate directory, or remove them completely if not needed. This enables new log files to be created when the applications server is restarted and will help you to focus on the current problem.

NOTE :  In the following section AutoConfig users should modify the < CONTEXT >.xml file as noted below then run AutoConfig to recreate the configuration files.  If you are not using AutoConfig you can manually update the configuration file directly

3. Enable debug logging for Apache
AutoConfig variable
s_apache_loglevel   Change to "debug"    Default value is "warn"

Manual update
Modify $IAS_ORACLE_HOME/Apache/Apache/conf/httpd.conf
LogLevel debug

4. Enable debug logging for mod_jserv
AutoConfig variable
s_apjservloglevel   Change to "debug"    Default value is "warn"

Manual update
Modify $IAS_ORACLE_HOME/Apache/Jserv/etc/jserv.conf
ApJServLogLevel debug

5. Enable debug logging for Jserv
AutoConfig variable
s_oacorelog   Change to "true"    Default value is "false"

Manual update
Modify $IAS_ORACLE_HOME/Apache/Jserv/etc/jserv.properties
log=true
log.channel=true
log.channel.info=true
log.channel.debug=true

6. Enable debug logging for Forms Listener Servlet JVM (Optional)

This step is only relevant if you have implemented Forms Listener Servlet as
described in Note 201340.1 "Using Forms Listener Servlet with Oracle Applications 11i"
and the reported problem is to do with the Core Forms

AutoConfig variable
s_oaformslog   Change to "true"    Default value is "false"

Manual update
Modify $IAS_ORACLE_HOME/Apache/Jserv/etc/forms.properties
log=true
log.channel=true
log.channel.info=true
log.channel.debug=true

7. AutoConfig users should now run AutoConfig to update the configuration files

8. Restart iAS 10222 for these changes to take effect using the adapcctl.sh (or adstrtal.sh) script

9. Replicate the problem

10. Review the log files for errors and warning messages relevant to the reported issue

The following files from the $IAS_ORACLE_HOME/Apache/Apache/logs directory
a) access_log.< ID Number >
by default rotatelogs is enabled, so there is a separate log file for every 24 hours.
b) access_log_pls.< ID Number >
PLSQL requests.  By default rotatelogs is enabled, so there is a separate log file for every 24 hours.
c) error_log
d) error_log_pls

The following files from the $IAS_ORACLE_HOME/Apache/Jserv/logs directory
d) mod_jserv.log
e) jserv.log
f) All files from the $IAS_ORACLE_HOME/Apache/Jserv/logs/jvm directory
These will have filenames of the form < JVM GroupName >.< JVM Instance>.stdout|stderr
For example OACoreGroup.0.stderr
g) $COMMON_TOP/rgf/< Instance>_/javacache.log

If you are obtaining this information for a Service Request logged with Oracle Support, please upload all of the log files from step (8) above and also provide the following information:

a) Configuration Files
All files located in the $IAS_ORACLE_HOME/Apache/Apache/conf directory**
   ** ensure you do not include any subdirectories such as ssl.key
All files located in the $IAS_ORACLE_HOME/Apache/Jserv/etc directory
$IAS_ORACLE_HOME/Apache/Apache/bin/java.sh
The following files from the $IAS_ORACLE_HOME/Apache/modplsql/cfg directory
    plsql.cfg
    wdbsvr.app
$FND_TOP/secure/< SID>_< Hostname>/< SID>.dbc

b) iAS version information

The version of iAS can be obtained by running the following command

$IAS_ORACLE_HOME/Apache/Apache/bin/httpd -v

NOTE - For shared APPL_TOP customers this is the actual $IAS_ORACLE_HOME and not $IAS_CONFIG_HOME.

c) Java Version
With the latest versions of AutoConfig for Unix platforms, the jserv.properties file "wrapper.bin="  entry will point to a java.sh script (normally $IAS_ORACLE_HOME/Apache/Apache/bin/java.sh), which was implemented in order to allow the capture of the stdout and stderr output. Refer to this java.sh file to find the explicit path to the java binary, which is referred to as JSERVJAVA in the script.

On Windows platform the "wrapper.bin=" will point directly to the java.exe binary.

Run the following command to identify the version of Java being used :-
   /java -version

You may be able to use the following script on Unix platforms to automate the above step
sh -c "`awk -F= '$1 ~ /^JSERVJAVA.*$/ {print $2}' $IAS_ORACLE_HOME/Apache/Apache/bin/java.sh` -version;"

Monday 7 June 2010

adctrl utility for managing jobs in 11i and R12

AD Controller is a general maintenance utility you use to determine the status of AutoUpgrade, AD Administration, or AutoPatch workers and to control worker operation. AD Controller is run in its own window, not in the same window as AutoUpgrade, AD Administration, or AutoPatch.
The command to start AD Controller is adctrl. AD Controller prompts you for standard items such as the log file name and the AOL username and password.

$ adctrl

AD Controller Menu
---------------------------------------------------
1. Show worker status
2. Tell worker to restart a failed job
3. Tell worker to quit
4. Tell manager that a worker failed its job
5. Tell manager that a worker acknowledges quit
6. Restart a worker on the current machine
7. Exit

After you have entered the username and password the above menu will open for ADCTRL.

Here we have 7 options.

You can start, stop and monitor the workers. Lets monitor status of workers with option 1:

Enter your choice [1] :

Worker Code Context Filename Status
------ -------- ----------------- -------------------------- --------------
1 Run Generic R120 BOMFMCPY.pll Running
2 Run Generic R120 BOMFMMDE.pll Running
3 Run Generic R120 BOMFMOPR.pll Running
4 Run Generic R120 BOMFMREV.pll Running


Logfiile location of adworker.
Depending on the number of workers from adpatch options, that much adworker???.log will create at
$APPL_TOP/admin/ORACLE_SID/log

Example:

$ cd $APPL_TOP/admin/VIS/log

For each adworker process, a log file is generated that shows activity and errors if any. Lets examine one of these log files:
$ cat adworker001.log
************* Start of AD Worker session *************
AD Worker version: 12.0.0
AD Worker started at: Tue May 20 2010 21:45:23

APPL_TOP is set to /u01/apps/apps_st/appl

Worker id = 1
Started by: adpatch

NLS_LANG value from the environment is : AMERICAN_AMERICA.UTF8
NLS_LANG value for this AD utility run is : AMERICAN_AMERICA.UTF8

Connecting to SYSTEM......Connected successfully.

Already asked for the ORACLE username and password
of Application Object Library.
(The given username/password was: APPLSYS/*****)

Connecting to APPLSYS......Connected successfully.

The status of various features in this run of AD Worker is:

Feature Active? APPLTOP Data model Flags
------------------------------ ------- --------
CHECKFILE Yes 1 1 Y N N Y N Y
PREREQ Yes 6 6 Y N N Y N Y
CONCURRENT_SESSIONS No 2 2 Y Y N Y Y N
PATCH_TIMING Yes 2 2 Y N N Y N Y
PATCH_HIST_IN_DB Yes 6 6 Y N N Y N Y
SCHEMA_SWAP Yes 1 1 Y N N Y Y Y
JAVA_WORKER Yes 1 1 Y N N Y N Y
CODELEVEL Yes 1 1 Y N N Y N Y
Reading product information from file...

For troubleshooting adpatch issues and errors, need to understand the log location of this adworkers.

Cheers!